
I’ll cut to chase without my requisite several hundred words. After years of brewing pourover coffee at home and at the office, I believe that pourover coffee is the best brew method the average person who’s looking for a great cup of coffee on a regular basis. Please throw out that instant stuff, or the single-cup systems that have pre-ground grinds. You’re doing yourself a disservice. There are plenty of videos of this procedure on brewmethods.com, but I find that sometimes reading the whole process can give you some additional details that don’t translate over video.
Equipment (with approximate retail prices):
– Hario V60 Ceramic Cone Brewer ($23) or Clever Coffee Brewer ($15)
– Hario Skerton Hand Grinder ($45) or High-Quality Burr Mill Grinder ($200) (keep those cheap blade grinders away)
– Hario Paper Filters or #4 Unbleached Cone Filters (for Clever)
– Water Boiler
– Reliable source of freshly roasted beans (not really equipment but it’s a pretty important ingredient)
Optional (but highly recommended) Equipment:
– Hario Glass Buono Kettle
– Cell phone or other timer device
– Hario Kettle for pouring water
– Small metal spoon or bar spoon
– Simple digital home scale ($35-50)
Steps
1. Dose (weigh) 25-27 grams of whole coffee beans and grind freshly. Use within 30 minutes to maximize flavor and aromas. (this is useful if you must grind the beans at home and refuse to look like a total weirdo while grinding your beans at the office with a hand grinder).
2. Place paper filter and wash through with ample hot water. Discard extra hot water.
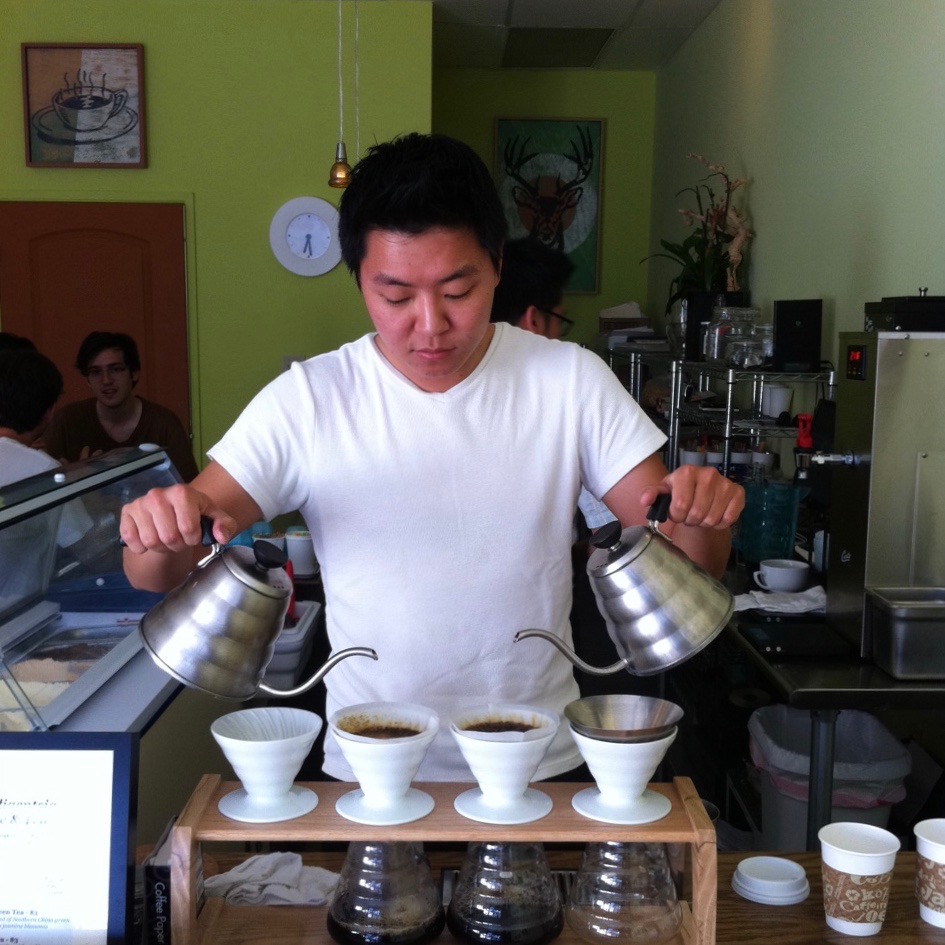
3. Place grinds into filter and tap the side of the cone to settle the grinds. This is important to pack the grinds together and get an even “pre-wet” or “bloom.” Place all the equipment (including coffee) over your Hario glass kettle, or even right into your mug, on the digital scale and “tare” it to zero (or just turn it on at this point – most scales start tared if you have something on it when you turn it on).
4. If you have your cell phone (most of which have timers or stopwatches), start your timer and add just enough water to just barely cover the grinds. You want to pour about 60g of water. If you have a small metal spoon, you want to gently agitate the grinds so that the water can penetrate the center part of the grinds. You’ll notice as you do this that the initial “pre-wet” water doesn’t necessarily reach the center part, so this spoon step is helpful.
5. The purpose of the pre-wet is to help the coffee grinds open up a bit in flavor, and also let the coffee release a bit of gas (hey, everything’s gotta let loose some time). Time this to about 30-45 seconds. The fresher the coffee is, the longer you should let it bloom.
6. This next step depends on the brewing device you’re using. If you have the Hario V60 ceramic cone, start pouring into the cone, enough to sort of push the top of the grinds to the side, then continue pouring in a small, clockwise circular motion. It’s infinitely easier if you have a metal Hario kettle, but it’s also feasible if you have a regular kettle. Try not to fill the cone all the way to the top, the water level should at most reach ¾ of the cone. Do this until your scale shows about 415g. A few grams more or less is okay, but try to get as close as you can.
7. If you have your handy metal spoon, gently sweep the top part of the “slurry”, or the grinds, along the rim of the cone. This way those top grinds can get equal extraction (or as I like to say, attention) from the hot water.
8. As soon as the water level goes through and you see the top part of the grinds as dry, then take the cone off the cup. The last few drops don’t taste great so you’ll be fine to let them not get into your cup.
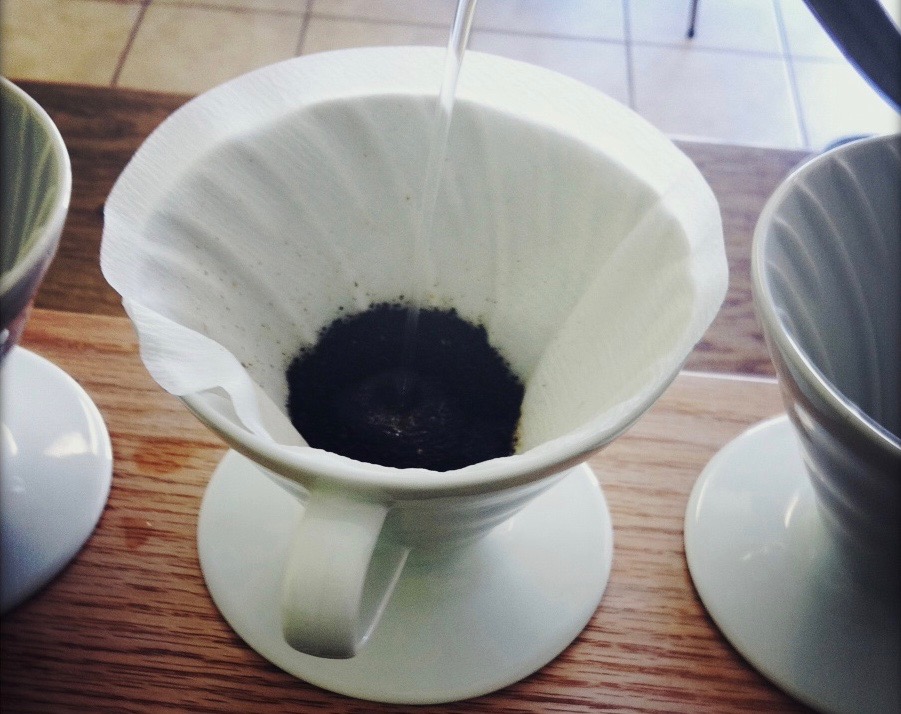
Proof of method resides below the Hario V60 brewer in the waiting coffee cup. [Matthew Kang]
9. The Hario glass kettle has two good functions. First, it lets you see the coffee drip through. I feel like this visual step makes the whole process worth it. It’s like using a glass mixing cup for stirring drinks like Manhattans – the bartender’s stirs should entice you to drink the beverage. Second, the kettle lets you swirl the coffee a bit and cool off before you drink it. Coffee, like all fine beverages, is ideal at a particular temperature. I like to stir my coffee vigorously for about 10 seconds before serving to let the aromas fill the room and also bring together all the flavors. If you don’t have a glass kettle and just have the coffee brew right into your mug, make sure to let it sit for a minute or so before you start drinking.
10. At this point, savor your coffee and enjoy all of its flavors. Dwell on the beauty of drinking a beverage that took months to grow and (hopefully) a great deal of care to deliver, roast, and (because your efforts) brew.
11. If you do it right, you’ll probably end up spending about a dollar per cup brewed in this method at home. You should use filtered or spring water for a better flavor – hard tap water will definitely hurt the quality of your coffee.
12. Don’t even think about sugar or milk. Well actually, I’m not so against milk as I am against sugar. If you have great coffee, don’t you want to taste it without anything else to get in the way? Isn’t that way you went through all this trouble to begin with?
13. Choose a source such as a local coffee shop or good Internet site that allows you to get your coffee freshly roasted. It does you absolutely no good to use low quality coffee with a pourover.
You might think this is a lot of work for one cup. I’m truly a believer that coffee brewed in this way not only tastes better, but the whole ritual will help start your day. Every ritual we perform seems perfunctory or difficult when we first start, but eventually it’ll be second nature to us. I do believe that the end result in your cup will please you so much that eventually you’ll barely see the trouble at all. The whole initial set up will put you back a few bucks, but it’s best to build up the collection over time. Start with the cone and filters first, and work your way up as you save up.


Blog Comments
Jenny
May 19, 2011 at 1:36 PM
Very informative! I’ll have to put some of those items on my wish list!
Coffee Beans
May 12, 2011 at 7:18 AM
Thanks for spreading the word about this great method! I am a micro roaster and coffee consultant and have been suggesting pourover to clients and customers for some time now. I have been enjoying it at home for years, and have been using it at farmers markets at sell my fresh roasted coffee beans at. Keep up the gospel spread! It’s folks like us that will make it a household word! Thanks again!—Tony DiCorpo
mattatouille
May 11, 2011 at 1:50 PM
Dave, thanks for the kind words. Yeah, I should have made a note about the final yield using these measurements, which is about 12 oz after the residual water in the coffee grinds. Come by Scoops and I’ll show you a bit in person – helps to see it front and center.
Dave Lieberman
May 11, 2011 at 10:19 AM
Nicely written, Matt. (See? Not being the coffee maverick here.)
Just a note for those who don’t have scales at home that a millilitre of water weighs one gram, so your 60g of water is very close to 1/3 cup, and the remaining 355g of water is almost exactly a cup and a half (12 fl. oz.).
I think it’s time for me to ditch the French press and try this—as soon as I get it together.
TreasureLA
May 11, 2011 at 9:45 AM
Very thorough write-up. This will be a good reference for me once I graduate past the hand grinder, cone, & filters and throw in a scale. I don’t mind being that “total weirdo” at work as long as I get a great cup of coffee. Of course, it can’t be emphasized enough, that good beans is the most important step in this process.